RESEARCH-BASED GUIDE · October 23, 2026
OBS Studio: Your First Screen Recording
A practical setup and playback checklist for tutorials and demonstrations.
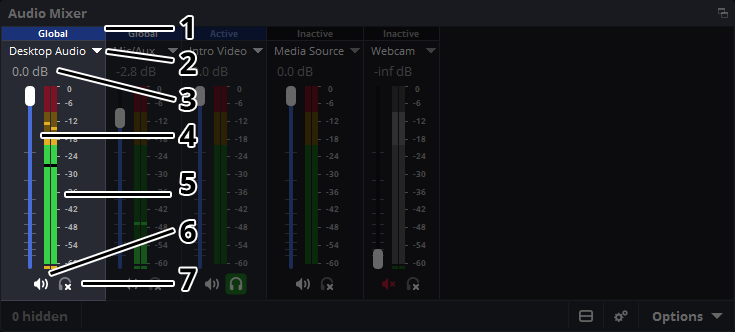
OBS Studio is worth considering when a recording needs several visual elements, such as a screen and webcam. Its official setup guide describes scenes and sources, an automatic configuration wizard, audio selection, and a test recording. This guide turns that starting point into a small trial you can evaluate yourself.
Start with the outcome
Write one sentence describing what the viewer should learn. A focused two-minute demonstration is easier to review than a long unscripted recording. Prepare a sample document rather than showing private customer information, and close notifications before capturing your screen.
Build a small test
- Run the Auto-Configuration Wizard from Tools and choose settings appropriate to your intended recording task.
- Add a source for the window or screen you want to show. Available capture choices differ by operating system.
- Select the intended microphone and watch the audio meters while speaking.
- Record a short demonstration, stop, and play the saved file back before making the full tutorial.
Find your saved recording
After clicking Stop Recording, choose File → Show Recordings in OBS to open the recording folder. Sort by modification date and open the newest file. To inspect or change the destination, go to Settings → Output → Recording → Recording Path (the layout depends on Output Mode). Choose a folder you can write to and with enough free space. Changing the destination does not move older recordings.
If you cannot find the file, confirm that you used Start Recording rather than only Start Streaming, then check the configured path. Make another brief recording and check for a new file in that folder.
No microphone audio? Check in this order
- Check the device: confirm the microphone is connected and any physical mute switch is off. Try it in your operating system’s sound input test; if that also fails, resolve the device or permission issue first.
- Select it explicitly: in OBS, open Settings → Audio and select the intended microphone for Mic/Auxiliary Audio, instead of relying on a default device that may have changed.
- Watch the correct meter: speak while looking at the microphone channel in the Audio Mixer. Desktop Audio activity alone does not confirm that your voice is being captured.
- Check mute and level: ensure the microphone’s speaker button is unmuted and its fader is not turned all the way down. The numbered screenshot above identifies both controls.
- Record and listen: capture a short spoken sentence and play the saved file. A moving meter is useful evidence, but playback confirms the result you will actually share.
If the meter moves but the recording remains silent, check your audio-track configuration against the official Audio Mixer Guide and verify that your player is playing the intended track. Avoid changing several settings at once; repeat the same short test after each change.
Judge the result
During playback, check whether small text is readable, the pointer is easy to follow, and speech is understandable. Listen for doubled audio, distracting room noise, and uneven volume. If something fails, change one setting and repeat the same short demonstration so you can compare the results.
When another approach makes sense
For a quick one-window explanation, first evaluate the recorder already available on your device. OBS is a candidate when you need more control over the composition; that control also introduces setup decisions.
Sources and corrections
OBS interface labels · Audio Mixer Guide
OBS official quick-start guide — consulted October 23, 2026. Product details can change.
For corrections, contact aolds71@gmail.com.